![Logo No Shadow Horizontal.png]](https://info.apartmentsnapshot.com/hs-fs/hubfs/Logo%20No%20Shadow%20Horizontal.png?height=50&name=Logo%20No%20Shadow%20Horizontal.png)
Options
Option 1, the System Administrator can create an SDE User account for Revolution RE [this process is described herein.
Option 2, the System Administrator can schedule a call with Revolution RE to complete the setup process through a screen share. Please reach out to schedule a time at support@revolutionre.com.
Please note that Option 2 may result in more time and effort on the part of the administrator as Revolution RE will need to ask for System Administrator’s assistance in the future.
Getting Started
There are three Steps in the setup process:
Step 1: Create a User in RealPage, and give that user SDE Credentials - a system administrator creates a new user in RealPage with SDE manager credentials. Please use the following email address and provide the user login and credentials to Revolution RE.
Username: support+[company.name]@revolutionre.com
Step 2: Select the Property List in Unified or Step 2: Select the Property List in OneSite - a system administrator assigns the properties that can be accessed to the new User account.
Step 3: Schedule Financial Reports and Budgets - a system administrator provides the new user with credentials that allow financial reports to be edited, or schedules two financial reports.
Step 1: Create a User in RealPage with SDE Credentials
The Administrator starts off by logging in to the RealPage System. RealPage now offers companies two ways to login to their accounts. The Unified login allows companies one login for all of their RealPage products, and the user goes to realpage dot com to get to their OneSite leasing account.
There are RealPage clients that still log in to their OneSite account directly, usually by going to their [company name].onesite.realpage.com. We will therefore distinguish the process when it differs between the Unified and OneSite user interfaces.
Create the User
In both systems, the administrator should create a New User and save the new user's email and credentials. We request that system administrator’s use the following email address: support+[company.name]@revolutionre.com.
In Unified
Now the administrator will need to set the role for the new user as an SDE Manager. In Unified with the new user created, the Administrator can now edit the new user.
Assign the User SDE Credentials
To do this, the Administrator should select Edit User. From here they select OneSite as the product. Now they can check SDE Manager for the new user from the available new user roles.
In OneSite
Complete the General Information section for the new user. Use RevolutionRE as the User Name. Now the Administrator should go to Section 2, the Properties section.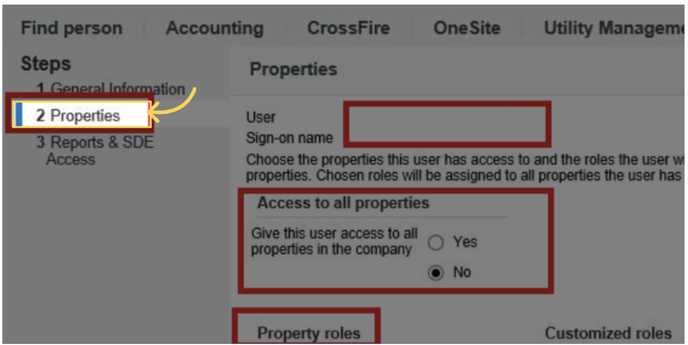
Set Property Role
After scrolling down the Properties page, in Property roles, the Administrator should select SDE Manager.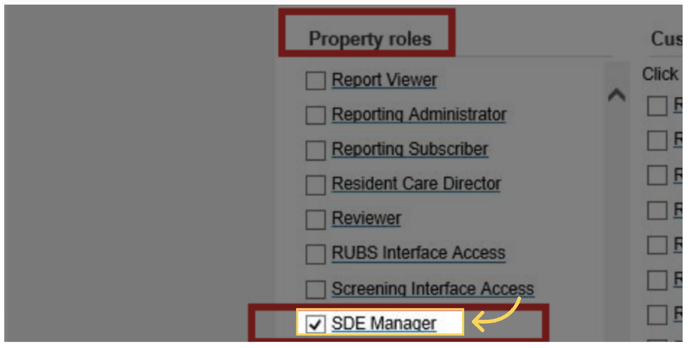
Set Reports & SDE Access
The Administrator should then give the New User access to all items in section three, Reports and SDE Access.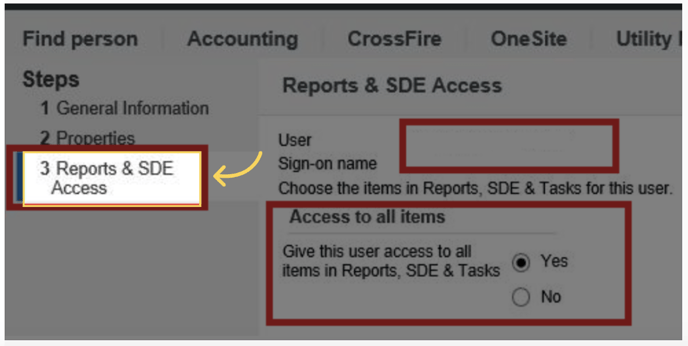
Step 2.1: Select the Property List in Unified
If the Administrator is working directly in Unified, while editing the user's credentials, the Administrator should go to the Properties tab and select which properties to give the user access to.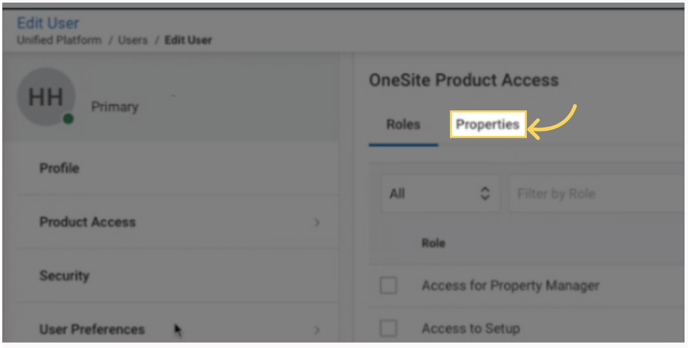
Or choose to Assign current and new properties automatically. 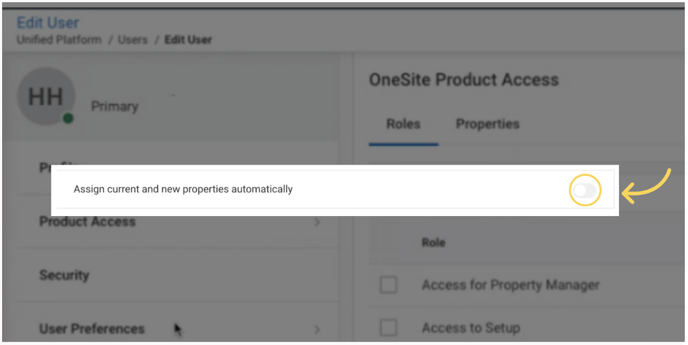
Step 2.2: Select the Property List in OneSite
Alternatively, if the Administrator is working directly in OneSite, the Administrator should go to Step 2, the Properties section to assign properties to the newly created user.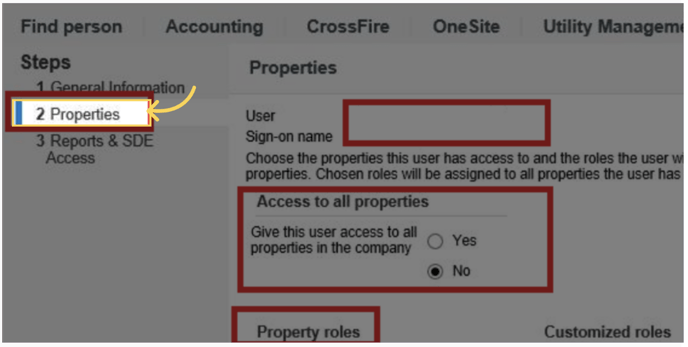
Here the Administrator can provide access to all properties OR create a property list and add individual properties.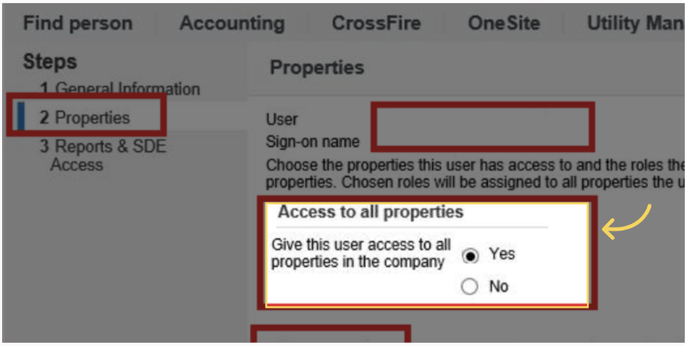
Step 3: Schedule Financial Reports and Budgets
And finally, Step Three, Scheduling of Financial Reports and Budgets. In order to schedule these for the client, the System Administrator is asked to provide Revolution RE with ability to edit reports in the Financial Suite. Alternatively, the Administrator can Schedule Financial Reports and Budgets
To schedule the needed financial reports, in Unified or Financial Suite, the Administrator should Select Applications, then Reports and then Financial Reports.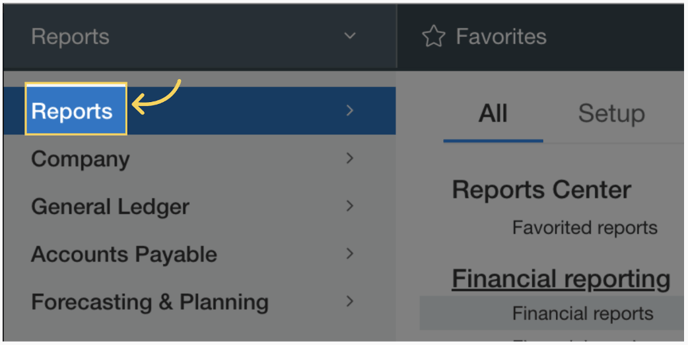
Next, the Administrator set the filters for the monthly financials and the budget. They should start by selecting the report with ‘12 Month’ ‘detailed’ and ‘financial’ in the name.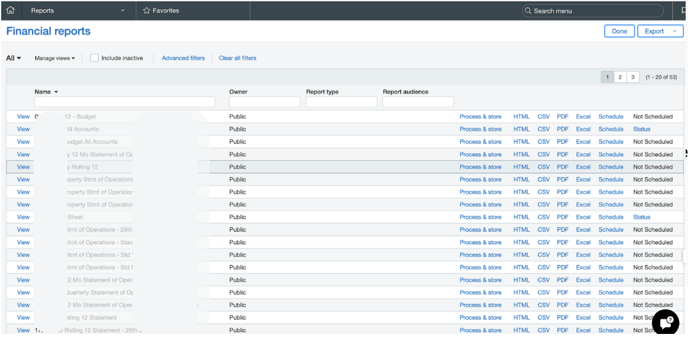
The financial report has different names at different organizations. The report that should be sent looks like this:
To set the filters, the Administrator should select View next to the associated report on the far left.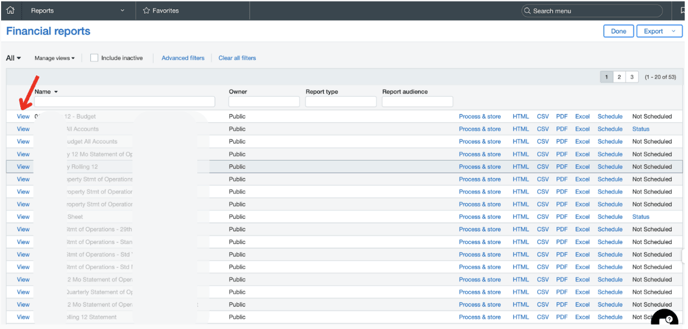
And then select the Filters tab on the left.
In order to get individual property financials from RealPage it is important to set the report filter to enable the report to be run as Individual Reports. In the filters page of the financial report, the Administrator should check the two boxes that read:
Run as Individual Reports for both Department and Location.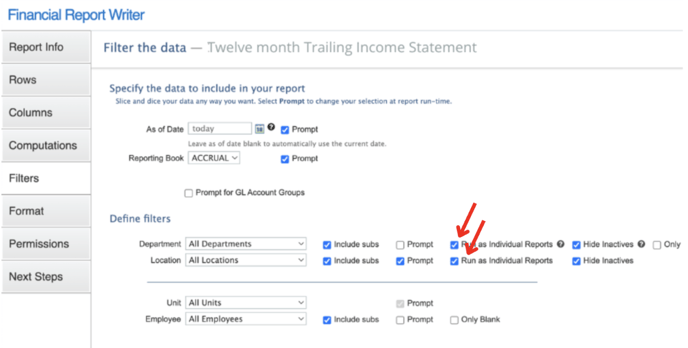
The final step is to schedule the monthly financials and budget in excel on a daily basis. To do this, the Administrator should return to the Financial Reports page and select the Schedule link 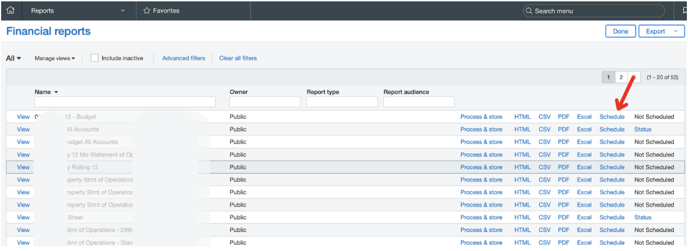
The Administrator should set the Start Date for [Today’s Date], the Ending Date [Never], the Recurrence [Daily], and Every [1 Day].
The method of delivery selected should be Email, and the email address used should be [company.name]_rp_financials@inbox.joyhub.io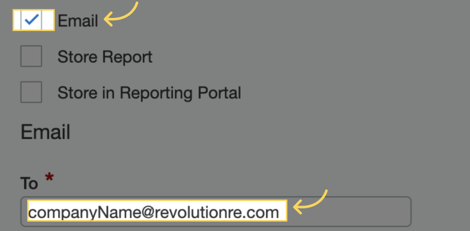
Once scheduled, the setup process is now complete for the System Administrator.
If there are any questions or assistance is needed, please email support@revolutionre.com.